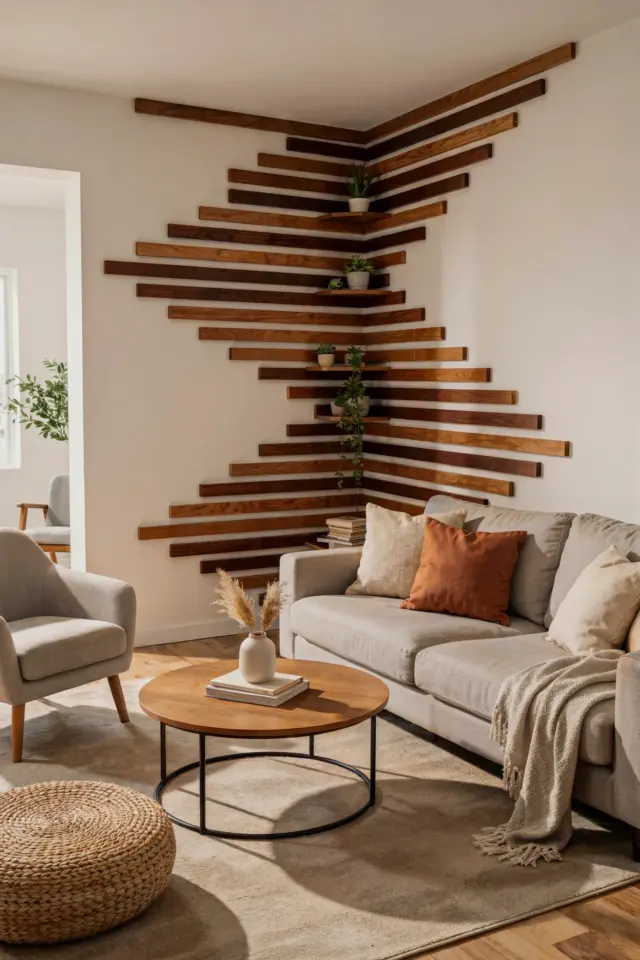
It was around 9 PM on a Thursday, and I was sitting on the floor of my hallway with a level, a stud finder, and a very questionable amount of patience. I had ripped open the packaging for a set of diy wall decor plans I bought online, and honestly, the first sheet made my head spin. But here’s the thing: we absolutely had to get this wall sorted. The hallway was a dead zone, just white paint and regret. Now, a year later, that same corner holds a custom floating walnut shelf system that people genuinely think was built into the house. It wasn’t. It was wood, screws, and a solid set of corner shelf plans.
Let me save you the headache I went through. This isn’t a fluffy inspiration post. This is a practical breakdown of the mistakes I made (and the ones I watched my friends make) when trying to build corner shelf plans for a modern wood wall decor look. We are going to talk about measurements, wood selection, and why your wall trim design might be fighting against you instead of helping.
Mistake #1: Assuming Your Corners Are Actually Square
Listen to me closely. Your walls are lying to you. Most corners are not a perfect 90 degrees, and if you build your shelves assuming they are, you are going to end up with giant gaps that no amount of caulk can save. I learned this the hard way with my first attempt. The left side was flush against the wall, but the right side gaped open like a canyon.
You need to use an angle finder or a simple scrap piece of cardboard to trace the actual corner radius and angle. Corner shelf plans that are sold as “one size fits all” usually fail here because they don’t account for wavy drywall or thick baseboards. Take a compass or a scribing tool and trace the wall profile directly onto your wood. It takes ten extra minutes, but it turns a flimsy looking install into something that looks factory made. This step is the difference between floating wall art that looks intentional and floating wall art that looks like a high school shop project.
Why Wood Wall Decor Needs a Plan (Not Just a Pinterest Board)
I know, I know. You see a gorgeous photo of a styled corner shelf online and think, “I can just wing it.” Look, I am a proponent of winging things. I once repainted a kitchen cabinet without sanding it first. But for hanging wood on walls, you need structure. A digital download with cutting lists is helpful because it gives you the exact angles for the miters and the precise depth for the box frame.
When I started, I tried to calculate the joinery in my head. It was a disaster. The proportions were all wrong. The shelves were too deep, making the hallway feel cramped, and the spacing between them was uneven. Using a proper plan (shout out to the folks at Ana White and similar sites for their free options) forces you to commit to a specific aesthetic. If you are going for a modern look, you want clean lines. That means your wood wall decor has to have a consistent reveal. A plan handles the geometry so your brain can focus on the sanding and the staining.
Selecting the Right Lumber for Floating Wall Art
Do not go to the big box store and grab the first pine board you see. Seriously. Look for boards that are straight and, ideally, cut from the same piece of lumber so the grain matches. I built a set of shelves for my living room using two different types of wood because I grabbed whatever was on sale. The stain came out blotchy and mismatched, and it ruined the entire vibe.
I would also avoid using plywood for the visible edges unless you are planning to cover it with edge banding. The plys show through and look cheap. For a modern wood wall decor makeover, poplar or clear pine is your best friend. It is soft enough to cut easily but hard enough to hold a screw without splitting. If you have the budget, oak is incredible, but it is heavy. You need to make sure your wall anchors are rated for the weight. The last thing you want is your beautiful shelves crashing down at 2 AM because you used cheap plastic drywall anchors for a solid oak project. Use proper lag bolts into the studs. Always.
Matching Your Wall Trim Design to the Shelf Profile
This is the secret sauce that nobody talks about. Your walls probably have some kind of trim, whether it is a simple quarter round or a beefy colonial baseboard. If you install a skinny, modern shelf above a thick, ornate baseboard, it is going to look disjointed. You need to let your wall trim design influence your shelf thickness.
In my hallway, we have craftsman style trim with a flat top. So, my shelves are a simple 2×12 with a minimalist face frame. It matches the flat, sharp edges of the trim. If you have rounded, traditional trim, consider adding a subtle router profile to the front edge of your shelves. This tiny detail helps the new wood wall decor feel like it was born with the house. Also, don’t forget to account for the height of the baseboard when hanging your bottom shelf. You want the gap between the floor and the bottom shelf to be intentional, not awkward. Use a laser level to project a line across the wall so you don’t end up with a shelf that looks drunk.
The Sanding and Finishing Process Nobody Enjoys
Ok so, let’s talk about the finish. You might be tempted to skip sanding because you are excited to see the color. That is a mistake. I sand my shelves to 220 grit, then I wipe them down with a tack cloth, then I sand them again with 320 grit. It sounds obsessive, but wood fibers pop up after the first coat of finish. If you skip this step, your “modern” floating shelf will feel like a splinter factory.
For the color, forget the paintbrush. Use a lint-free cloth to wipe on a gel stain or a Danish oil. It gives you so much more control over the opacity. If you want a modern look, don’t try to make the grain disappear. Let it show. A matte polyurethane topcoat is your friend. Glossy finishes scream 1990s kitchen cabinets. I made the mistake of using a satin poly once thinking it would be glossy enough, but it ended up looking a little too shiny under the hall lights. Rub it down with steel wool between coats for a smooth, soft touch.
Installation: Leveling, Anchors, and the Final Reveal
The installation phase is where most DIY wall decor projects go to die. You need a strategy. My strategy was to use a French cleat system for the heavier shelves. It is more secure than simple L-brackets, and it also allows the shelf to sit perfectly flush against the wall without visible metal hardware.
Here is a quick checklist for you:
– Locate the studs with a magnetic stud finder, not the electronic one that beeps for no reason.
– Pre-drill everything. Screws hate being forced into hardwood, they will strip out.
– Use a long level, like 4 feet long, not a tiny 6-inch torpedo level.
– Hold the shelf up with painter’s tape temporarily to check the visual height before committing to holes.
– Anchor the French cleat to the wall, then slide the shelf onto it.
After the shelves were up, I stood back and realized the biggest mistake I almost made was spacing them too far apart. I moved them closer together, about 14 inches apart, and suddenly the wall looked like a built-in library feature. The corner shelf plans I used had suggested spacing, but you need to adapt them to your specific room scale. A stairwell might need more space; a tight hallway needs less.
Styling Without Clutter
The build is done, but the project isn’t finished until it’s styled. This is where restraint matters. A modern corner shelf is not a catch-all for mail and keys. It is a focal point. I recommend sticking to a rule of three on each shelf. One tall object, one medium, and one small to create a triangle of visual interest.
Don’t cram the shelves full of dusty books and fake plants. Curate it. Use a single ceramic vase with dried eucalyptus, a stack of two art books, and a small geometric sculpture. Leave some negative space. The wood needs to breathe. Adding a little LED strip underneath the middle shelf to wash light down the wall makes the whole thing look museum quality. Honestly, that lighting trick hides a multitude of minor flaws because it casts shadows downward and distracts the eye.
The whole project took me a weekend, but that includes a trip back to the lumber store because I misjudged my cut list. That is the reality of woodworking. You will mess up a cut. You will buy too much stain. But when you walk past that hallway and see that beautiful wood wall decor catching the morning light, you realize it was worth every annoying second.
If you are ready to stop staring at a blank wall and start measuring, grab the printable plans. They give you the exact angles to make this project feel almost too easy. Save this post for your next weekend project, and let me know how your corner shelf plans turn out. I promise, the effort is worth it.
Leave a Comment