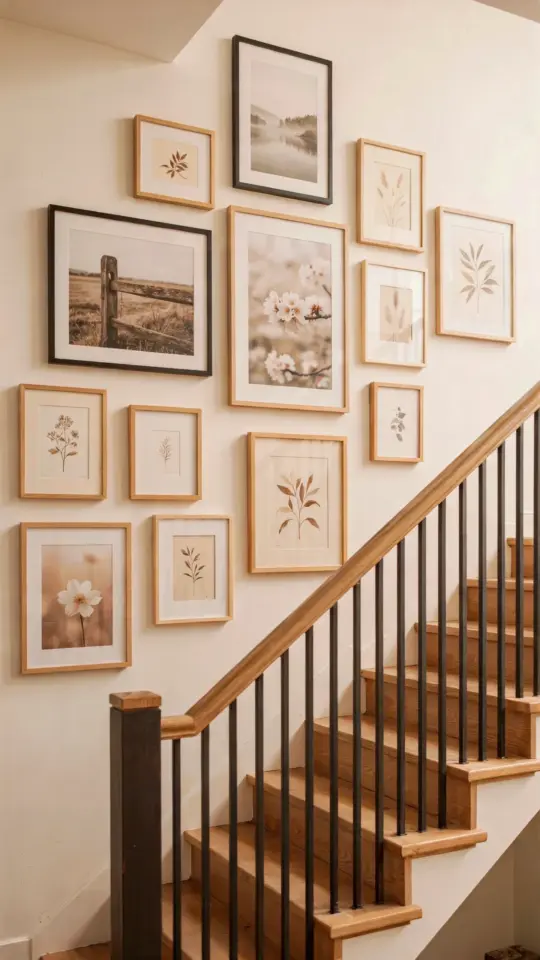
Okay, let’s talk about the staircase gallery wall. You know the one: the tall, angled wall running up the steps, just begging to be filled with art. Most people grab a hammer, a level, and a vision, then they start hanging. About thirty minutes later, they step back and see why that was a mistake; nothing lines up, the frames tilt, and the wall looks like a target practice range.
Here is the honest truth: a straight grid layout on a curved line (your stairs) will fight you the entire way. The angle of the staircase changes everything about how you measure, how you space, and how you hang. If you just eyeball it, you are not gonna have a good time.
So before you put a single nail in the drywall, you need to cut some paper. This is not a suggestion. It is the entire process.
Why the Staircase Gallery Wall Goes Crooked (and Why Grids Are a Trap)
The problem with hanging frames on a staircase is that the floor is not flat, obviously, but your eye still expects the art to be level. A grid layout, which relies on perfect horizontal and vertical alignment, has zero tolerance for the pitch of the stairs. Even a slight slope in your steps will make a perfectly leveled frame look tilted when you view it from the bottom landing.
Now, you might be tempted to just align the frames with the stair stringer (the diagonal line of the steps). This creates a “stair step” layout, which is a different vibe. But if you are set on a modern, clean grid, you have to commit to the templates. Look, a grid on a staircase is one of those gorgeous, magazine-style looks. But it is also a brutal test of measurement.
Here is the thing: your staircase wall is not a stable reference point. The floor isn’t level, the walls aren’t plumb, and the trim might be slightly crooked. If you measure from the floor, the grid will look uneven. If you measure from the ceiling, same problem. You need a system.
Getting Started: The Tools You Actually Need for a Staircase Gallery Wall
Most tutorials make this sound way more complicated than it needs to be, but you honestly just need a few cheap things. You probably already have most of them lying around the house. Do not overthink this, and do not buy fancy laser levels yet.
- Kraft paper or wrapping paper (enough to cover each frame face)
- Painter’s tape (the blue stuff that won’t peel your paint)
- A measuring tape
- A pencil and a calculator (or just your phone)
- Scissors
- A long level (this is important, but a short one works if you’re patient)
That’s it. You don’t need a stud finder if you are using heavy-duty picture hangers, but it helps if your frames are massive. The paper is the hero here. It is cheap, it is forgiving, and it will save you a ton of regret.
Also, here is a weird little aside: when you are drawing the frames onto the paper, trace the actual frame, not the opening. I know that sounds obvious, but people do it backwards all the time. They trace the glass, tape the paper up, and then realize the frames are four inches bigger than the template. You will be mad. I have seen it happen.
Step 1: Measure the Stair Angle (and Trust the Number)
Before you can line up a grid, you need to find the exact angle of your staircase. This is the number that most people skip because they think they can “eyeball it.” You cannot eyeball it. Your eyes will lie to you, especially when you are standing three feet away from the wall.
Take a straight piece of cardboard (a long level is perfect for this, but a piece of poster board works too). Hold it along the edge of your stair treads, right where the tread meets the riser, and let it extend up onto the wall. Now, draw a line along that board onto your wall with a pencil. That is your stair angle. Honestly? This takes about fifteen seconds, but it completely changes the hanging game.
That pencil line is your baseline. It is the one measurement you can trust. I have a tiny pencil mark on my own wall from doing this, and I am pretty sure the paint will never fully cover it, but the frames hide it, so I don’t care. It is a small price to pay for a straight grid.
Step 2: Build the Grid on Paper, Not on the Wall
Now you have the angle, so you can plan the layout. This is where the magic happens: you stop trying to make the wall behave, and instead, you create a temporary wall out of paper that mirrors your real wall exactly. This might sound like a lot of work, but it is actually a huge time saver.
Lay your kraft paper out on the floor and draw your stair angle line across it. From that line, measure up the exact same distance for your top row and bottom row of frames. For example, if you want a gap of 2 inches between the bottom of the frames and the stair stringer, draw a parallel line 2 inches above your baseline. That becomes the bottom edge of your paper grid.
Here is how you avoid the “just eyeball the spacing” trap: pick a margin, a consistent distance between each frame. Maybe it’s 1.5 inches. Maybe it’s 3 inches. Whatever you choose, stick with it. Draw boxes for each frame on the paper. Then, cut out the top and bottom edges of the paper pieces to create your templates. Now you have a physical representation of the exact wall layout.
A quick side tangent: if your frames are not all the same size or orientation, this paper process lets you test funky arrangements, like a 3×2 grid with one large center piece. But don’t forget that on a staircase, your eye sees the diagonal first. So if you are mixing sizes, keep the bottom line nice and tight to the angle.
Step 3: Tape the Templates to the Wall and Judge Them Like a Critic
Here is the part that feels weird: you are going to tape a bunch of paper rectangles to the wall and just stand there. That sounds stupid. Do it anyway. You need to live with the layout for a few hours, maybe overnight, to see if the spacing actually works with your furniture and your lighting.
Use your stair angle pencil line as the guide for the bottom row of templates. Tape them up. As you place each template, step back and look at the whole picture. Are the gaps even? Does the grid feel too high? Too low? Does the view from the top of the stairs look totally different from the view at the bottom? This is your only chance to adjust the layout before you commit, so be honest with yourself.
If a frame needs to move an inch to the left, peel the paper, move it, and re-tape it. No damage done. Try moving the entire grid down two inches. That small change can make a huge difference in how the flow feels. I once spent twenty minutes moving a single paper frame because I couldn’t decide if it clashed with a weird shadow on the wall. That is the level of patience this project needs.
Leave the paper on the wall for at least a day. You will probably find that you hate the spacing by the evening, which is good. It means you found out before you made a hole. Change it. Sleep on it again.
The Real Wall Hanging Sequence (or How to Not Lose the Plot)
Once you are happy with the paper layout, do not start trying to hang all the frames at once. You will get confused, and you will put a nail in one wall and a hook in another and realize the frame has nowhere to go. The template method works best in a very specific order.
Here is the plan: grab the first template (the one at the bottom of the stairs, let’s say). Press the nail or hook through the center of the paper, right at the point where the hanging wire will rest. Remove the paper. Hang the actual frame on the freshly installed hardware. Then, for the rest of the frames, you don’t have to guess; you use the surrounding frames as your reference point, but only because the paper already did the heavy lifting.
For the record, that center point on the paper needs to be marked carefully. Usually, it’s about 1 to 1.5 inches down from the top of the frame, depending on your hardware. I use a simple trick: I lay the frame flat, drop the wire, and measure from the top to the peak of the pulled-up wire. That tells me exactly where to put the nail. Don’t just assume it’s in the middle, because the wire will always sag a little.
Is a Grid Even the Right Look for Your Stairs? (A Quick Check)
Let me stop you for a second. A grid layout is rigid. It is structured, modern, and graphic, but it also requires a lot of wall space. If you have a narrow staircase, or a wall that is interrupted by a window, a grid might feel cramped, not cool. Sometimes a loose, organic arrangement is the right call.
But if you are set on the grid (and the title of this post suggests you are), make sure you have the dimensions to back it up. Your paper templates will quickly show you if the wall is too small. And honestly, seeing the outline of the frames on the wall is the best reality check you can get. If the paper looks cramped, the real frames will look twice as cramped.
Give yourself permission to scrap the grid and do something else. The paper should be a plan, not a promise. I have scrapped a grid at the paper stage, and I was so glad I did. The wall looked better with a smaller, staggered set of frames anyway.
Also, if you have kids running around or a dog that uses the stairs as a launchpad, maybe go for unbreakable prints on lightweight frames. This is a lesson I learned the hard way when a stray dog tail knocked over a stack of my leaning frames. Not the same as hanging, but it still hurt my soul.
When you are ready to commit, hang the first frame, then immediately stand back and look at it from the top of the stairs. Yes, the top of the stairs. The view changes completely, and you need to know if your eye level is going to agree with the bottom landing view. If it looks good from both spots, you are set. Just repeat the process for the remaining templates, hammering, checking, and moving down the wall.
And that is it. You are done.
Here’s the final takeaway: the template step is not an optional extra. It is the difference between a happy afternoon and a weekend of filling holes with Spackle. Take the extra ten minutes. Your wall will thank you, and so will your sanity. If you find a better trick for marking that wire point on the paper, tell me about it below. I am always curious how other people make this job easier.
Leave a Comment