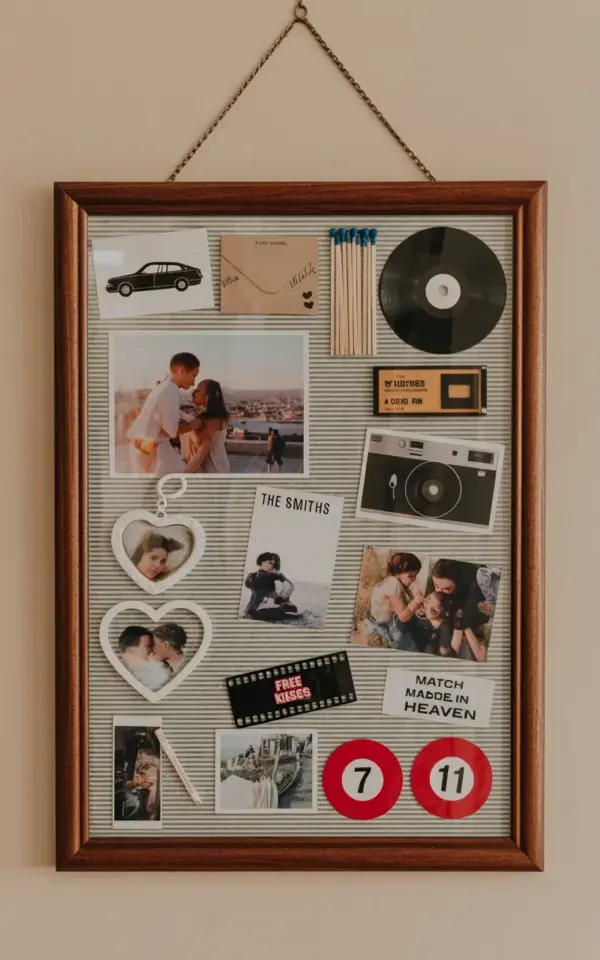
If you have ever tried to create a vintage memory board collage, you probably know the temptation to throw every old ticket, photo, and trinket onto the board. The biggest mistake I see with vintage memory board collages is overloading them with unrelated clutter. That ruins the whole look and turns a curated piece of wall art into a messy bulletin board. I want to show you a better way, using a real example: a collage featuring a gray striped wallpaper background, a black car illustration, a Smiths album cover, pool balls, and matchsticks. This arrangement works because every item shares a retro music and memorabilia mood. Let each piece have space to breathe, and your wall decor will feel intentional, not chaotic.
Why a Unified Mood Prevents Clutter in Your Vintage Collage
A memory board without a clear theme becomes visual noise. You need one central idea that ties every element together. In the example photo, the mood is clearly retro music and memorabilia. The Smiths album cover sits next to a black vinyl record, a vintage camera photograph, and red pool balls numbered 7 and 11. Those pool balls might seem unrelated, but their classic red color and rounded shape fit the retro arcade or dive bar vibe. Even the “free kisses” sticker and the “Match Made In Heaven” stick feel like playful nods to a past era. When you pick a mood first, you automatically filter out items that don’t belong. That is the simplest way to avoid clutter.
Start by asking yourself: Do I want a 70s rock vibe, a 50s diner look, or a bohemian travel theme? Write down three words that describe that mood. For this collage, the words might be “retro music, arcade, and nostalgia.” Then only include items that match at least two of those words. That rule alone will cut down on the random stuff.
How a Background Anchors Your Memory Board Collage
The background is your foundation, and it matters as much as the items you place on top. In this collage, the gray striped wallpaper acts like a neutral grid. The vertical stripes add structure without competing with the objects. A busy background, like a floral print or bold geometric pattern, can easily overwhelm small items. Keep your background simple so that it supports, not distracts. A solid color, a subtle stripe, or a light wash of paint works best.
If you use a dark brown wooden frame, as seen in the photo, choose a background that contrasts with your frame. The gray wallpaper against the dark wood creates a clear border. That contrast helps the eye focus on the collage inside. For your own board, try a piece of vintage wallpaper, a section of old sheet music, or even a cut‑out from a retro magazine. Just make sure the pattern is tame enough that your items remain the stars.
Choose Items That Tell One Story (Not a Hundred)
Every piece on your memory board should add something to the story. The collage in the photo includes a heart‑shaped locket with photographs, film strip negatives, and a postcard envelope. Each of these objects carries memories or evokes a bygone era. But notice there are no random keys, no unrelated ticket stubs from a 2010 concert, and no modern plastic toys. The collection is tight and meaningful.
- Stick to a color palette. This collage uses black, white, red, and gray. The black car illustration, the Smiths album cover, and the black vinyl record all share that dark tone. The red pool balls and the red “free kisses” sticker add a pop of warmth. Limit yourself to two or three main colors.
- Vary the textures and sizes. Mix flat items (like the album cover) with dimensional ones (like the matchsticks and pool balls). That gives the collage depth without clutter.
- Leave empty space around each item. In the photo, you can see the gray wallpaper clearly between the objects. That breathing room is essential. If your board is packed wall‑to‑wall, remove half of the pieces.
Arranging Your Vintage Treasures Without Overcrowding
Lay out everything on a table before you attach anything to the board. This is where you can test spacing. Place your largest focal points first. In this example, the Smiths album cover and the black car illustration are probably the biggest visual anchors. Put them slightly off‑center for a more organic look. Then add medium items like the vintage camera photograph and the red pool ball 11. Finally, tuck in the smaller details: the matchsticks, the film negatives, and the “free kisses” sticker.
As you arrange, keep a ruler or a piece of string handy to check alignment. Not everything has to be perfectly straight. A slight tilt can feel vintage and casual. But if you have five items all tilted in different directions, it starts looking like a jumble. Let most pieces sit straight, and allow one or two to lean a little for character.
A practical step: take a photo with your phone after every few adjustments. The camera lens often reveals overcrowding that your eyes miss in person. Compare your arrangement to the example: notice how the gray striped background is visible in several gaps. Aim for at least 20 to 30 percent empty space on the board.
Attaching Items Without Damaging Them or Your Background
How you fix objects to a memory board matters for both longevity and appearance. For paper items like the postcard envelope, the Smiths album cover, or the “free kisses” sticker, use acid‑free double‑sided tape or archival glue dots. That way the paper won’t yellow over time. For heavier objects like the pool balls or the locket, small clear pushpins or mini picture hooks work well. You can also sew on items using heavy thread through the background fabric (if your board has a fabric cover). The matchsticks and the film negatives are lightweight enough for a dab of strong glue or a tiny clip.
If you use pushpins, choose ones with a black or brass head to match the vintage feel. Avoid bright plastic ones. In the photo, the dark wooden frame already gives a classic look, so the attachment method should be invisible or rustic.
Common Clutter Mistakes and How to Fix Them
Even with a clear mood, a good background, and thoughtful arrangement, it is easy to slip into clutter. The most common error is adding “just one more” item because it is sentimental. Sentiment is beautiful, but a board overloaded with emotion becomes hard to read. If you have ten childhood photos, pick the best three. If you have a stack of concert tickets, choose the one that best represents your favorite show.
Another mistake is mixing eras too broadly. A 1950s diner matchbook next to a 1990s Game Boy cartridge can feel disjointed unless you have a strong transitional item. In this collage, everything stays within a 1960s to 1980s retro zone. The black car illustration looks like a 70s muscle car, the Smiths album is from the 80s, and the vintage camera suggests mid‑century. They all nod to the same time frame.
Finally, avoid using your memory board as a dumping ground for every gift card, receipt, or business card you ever saved. Be ruthless. If an item does not fit the mood or the color scheme, put it in a keepsake box instead.
Keep Your Collage Fresh Over Time
A vintage memory board collage is not a permanent sealed artwork. You can switch out pieces as you find new treasures. The beauty of a board like this is its flexibility. Every few months, remove one or two items and add something new. This keeps the arrangement from feeling stale and stops the accumulation of clutter. In the example, you could replace the Smiths album cover with another retro band, or swap the pool balls for a set of old dice. The background remains the same, so the mood stays consistent.
When you change items, re‑evaluate the spacing. Our tendency is to fill gaps immediately, but sometimes a gap makes the whole board look more refined. Let the empty space be part of the design.
Planning your own wall collage? Remember that less is more. A carefully edited vintage memory board collage will always look more intentional and stylish than a dense pile of memories. Start with a mood, choose a background that anchors, give each piece room to breathe, and you will avoid the clutter mistake for good.
If you found these tips helpful, consider sharing your own collage with us. I would love to see what retro treasures you choose.
#vintagecollage #memoryboard #walldecor #retrostyle #collageart
Leave a Comment